First figure out if your cap is threaded, welded, or bolted and gather a flashlight, feeler gauge, protective gloves, and a proper wrench or pin‑spanner. Secure the cylinder in a padded vise, then, if it’s threaded, warm the threads with a heat gun to ~250 °F to melt any Loctite without hurting the seal. Use a hydraulic cap wrench or a head‑hook spanner, applying steady torque and avoiding sudden jerks. For access‑hole caps, fit a pin wrench or cobra pliers and add a pipe extension for leverage. After removal, inspect threads and seals, clean any residue, and re‑apply anti‑seize. The good news is that these steps keep your equipment safe and ready for the next job—more tips await if you keep going.
Determine the Cap Type and Gather the Right Tools
If you’re standing in front of a hydraulic cylinder and wondering whether you’re dealing with a threaded cap, a welded one, or something else entirely, the first step is to identify the cap type before you even think about tools. Take a quick visual inspection: threads around the rim mean a threaded cap, a smooth bead of metal signals a welded cap, and bolts or tie rods point to bolted or tie‑rod designs. Notice the cap material—steel, aluminum, or composite—because that tells you how much force you can safely apply without compromising seal integrity. The good news is you don’t need a full workshop; a simple flashlight and a feeler gauge often reveal enough to pick the right wrench, socket set, or cutting torch for the job. Always wear protective gloves and eye protection when handling hydraulic components, as the fluid can be hot and under pressure, and check the hydraulic fluid level before starting any removal work. Properly venting the system can prevent pressure spikes, which is especially important when you lack a dedicated bleeder valve. Adding a bleeder valve to the cylinder can simplify future maintenance and ensure consistent fluid flow.

Application---Trim Caps on ALL SHOWA manufactured Trim/Tilt Units for Yamaha ,Evinrude, for Honda

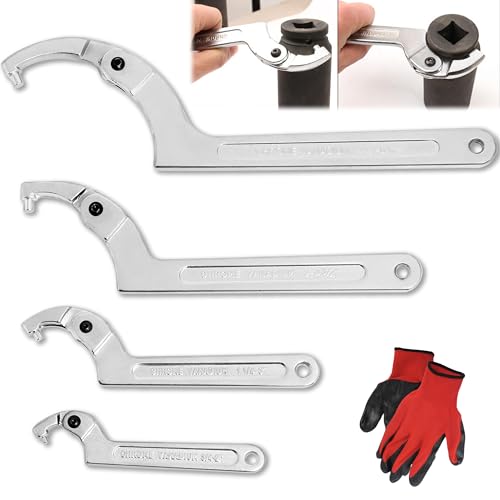
APPLICATION RANGE -- Alternative to OTC 7463. Small adjustable wrench with two slot works on gland nuts with a pin hole size of 1/4 & 7/32", the claw is adjustable within the range of 1 to 3-3/4 inch (2.5 to 9.5cm).

〖Product Compatibility〗: This pin wrench set perfectly fits all Yamaha, Suzuki, Johnson, Evinrude hydraulic Trim/Tilt end caps and all Seastar hydraulic steering end caps, compatible with most mainstream outboard models
Secure the Cylinder for Safe Sealed End Cap Removal
Once you’ve figured out whether the cap is threaded, welded, or bolted, the next step is to lock the cylinder in place so you can work on the end cap without the whole thing wobbling or shifting. Start by positioning the cylinder horizontally in a sturdy vise. Slip a layer of cylinder padding—wood or rubber—between the jaws and the tube to keep dents off the surface. Tighten the jaws evenly until the body is immobilized but not crushed. While you’re at it, set up a torque‑monitoring system: attach a cheater pipe to your wrench and watch the gauge so you don’t over‑torque. Use a strong grip with a hydraulic cap wrench or Stillson wrench, and keep the cylinder balanced midway between the caps for steady leverage. Check the padding occasionally and release a little pressure to confirm everything stays snug. The impact‑hammer attachment can be snapped onto an air hammer to deliver parallel impacts that break seized caps loose. Understanding hydraulic pressure helps you select the right torque settings for safe removal. Always verify the fluid level before starting work to prevent accidental spillage or contamination. Regularly inspect the fluid for discoloration to catch early signs of degradation.
Apply Controlled Heat to Loctite‑Sealed Threads Without Damaging the Seal
When you need to loosen a Loctite‑sealed thread on a hydraulic cylinder, the trick is to heat it just enough to soften the anaerobic cure without scorching the surrounding seal or the cylinder’s metal. Start with a heat gun set to about 250 °F and move it slowly around the thread, keeping the flame focused on the metal and away from the rubber seal. This heat management prevents the seal from reaching its degradation point while still loosening the bond. After a steady five‑minute soak, you’ll see the Loctite 545 soften; you can then turn the cap with a hand wrench while the metal’s hot. The good news is that the seal integrity stays intact because you never exceed the 500 °F threshold that would damage the hydraulic gasket. Hydraulic control is essential for precise operation of harvesters. Proper storage of hydraulic fluid reduces fire risk and helps maintain system safety. The pulsating surge generated by a hydraulic ram pump can also be harnessed to provide low‑energy power for auxiliary tools. In extremely cold climates, using a low‑viscosity hydraulic fluid can prevent freezing and keep the system operating smoothly.
Select the Appropriate Wrench Before Applying Heat
A solid wrench choice is the foundation before you even think about heating the end cap. Start by measuring the gland’s notches or pin holes—Wrench sizing matters because a head‑hook spanner fits notched rims on Caterpillar and John Deere, while a face‑pin or head‑pin fits the holes on Case, Bobcat, or similar machines. Use a tape or caliper to capture center‑to‑center spacing and pin‑hole diameter (usually 1/8″‑3/16″). Pick a wrench that matches those dimensions; an adjustable head‑hook or face‑pin with the right socket (1/2″ or 3/4″) will grip firmly without slipping. The good news is that a proper fit boosts heat safety—less slippage means you won’t need extra force, reducing the risk of overheating the seal while you apply controlled heat. The tool’s dual‑hole engagement provides extra leverage and full rod coverage, further preventing slippage during the heating process. Always check fluid level before starting any hydraulic maintenance to ensure the system remains properly lubricated. Before heating, verify that the cylinder’s seal condition meets the manufacturer’s specifications. Properly sized hydraulic components are essential for delivering the high‑force, low‑speed performance required in wood processing equipment.
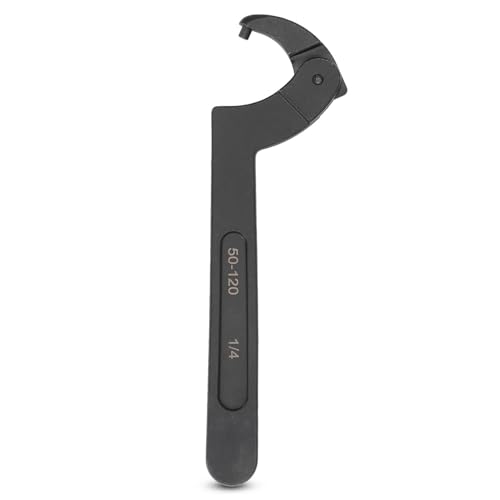
Adjustable Opening Size: C type wrench can adjust the opening size within the range of 2 to 4 3/4in. Suitable for 50 to 120mm. Spanner wrench is widely used in home repairs, automotive maintenance, plumbing, appliance repair, machine tool maintenance, and mechanical repair.

Package Dimensions: 7.366 cms (L) x 21.082 cms (W) x 0.762 cms (H)

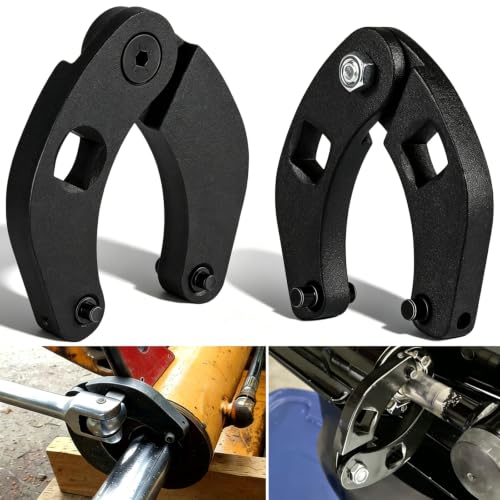
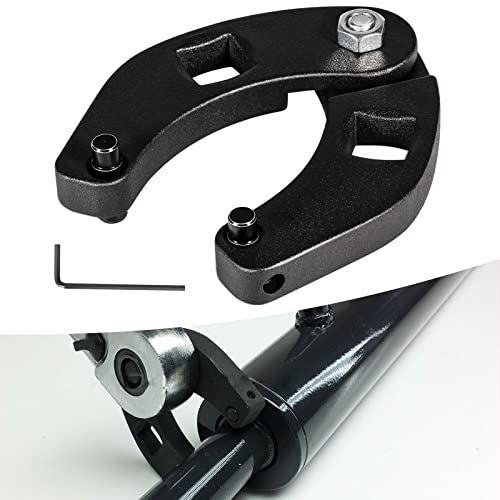
Adjustable Opening Range: Universal 3-jaw hydraulic cylinder spanner wrench with inner diameter adjustable from 130mm to 170mm, fits most 35-125 ton excavators and hydraulic equipment.
Grab a Pin Wrench or Cobra Pliers When the Cap Has Access Holes
Ever tried turning a stubborn hydraulic cylinder end cap and found yourself stuck because the holes are tiny and oddly spaced? Grab a pin wrench or cobra pliers and you’ll be set. The pin wrench’s spanner pins line up perfectly with the 180‑degree holes, so you get solid bite without stripping. Cobra pliers give you adjustable jaws that hug the cylinder body, keeping the grip tight while you turn. Pay attention to tool ergonomics—choose a handle that feels balanced in your hand, and you’ll apply steady torque without fatigue. Material compatibility matters too; steel pins work best on metal caps, while the pliers’ softer jaws protect aluminum or composite housings. Secure the cylinder in a vice, clean away grease, and you’ll have a stable platform for a smooth, slip‑free removal. The process can be aided by adding a third drilled hole to increase leverage and break the cap loose. Proper handling of hydraulic fluid prevents toxicity risks to operators and the environment. Understanding hydraulic pressure ratings helps select hoses that can safely transmit the forces required for wood‑processing equipment. Using fluid fluid with the right viscosity range ensures consistent power transmission and reduces wear.
APPLICATION RANGE -- SET OF 2 WRENCHES. Large adjustable wrench with one slot for gland nuts with 1/4” & 5/16” diameter pin holes, the claw is adjustable within the range of 2 to 6 inches. And the small adjustable wrench with two slot works on gland nuts with a pin hole size of 1/4 & 7/32", the claw is adjustable within the range of 1 to 3-3/4 inch (2.5 to 9.5cm).
Versatile and Reliable: The adjustable C pin spanner round head design is highly versatile and adaptable to different applications. works with machine tools, vehicles, hydraulic cylinder ,and mechanical equipment,as it enables you to access hard-to-reach places with ease, providing the necessary leverage to loosen or tighten components effectively.

ADJUSTABLE SPANNER WRENCH SET: This Orion Motor Tech hook and pin wrench set includes 4 wrenches to cover the most commonly needed sizes of 3/4″ to 2″, 1-1/4″ to 3″, 2″ to 4-3/4″, and 4-1/2″ to 6-1/10″; the set also comes with 4 interchangeable adapters
Use a Pipe Wrench With Extension to Apply High Torque on Stubborn Caps
Grabbing a 6‑foot pipe‑wrench extension and swinging it like a lever can finally pry that stuck hydraulic cylinder cap loose. The extension gives you a huge mechanical advantage, turning a modest hand force into serious torque amplification. First, slide the Stillson‑type pipe wrench onto the cap’s pin holes—make sure the pins match the 1/8‑to‑3/16‑inch range so they won’t slip. Then, clamp the pipe extension securely; the longer the pipe, the more extension leverage you get. As you push or pull, the lever action multiplies the force, breaking the glued or pressure‑seized threads. Keep a firm grip on the cylinder body, and you’ll feel the cap loosen without needing a hammer or extra tools. Always wear appropriate PPE to protect yourself from hydraulic fluid exposure. Using a corrosion‑resistant hydraulic fluid can further reduce the risk of metal degradation during maintenance. Properly inspect the seal groove for wear damage before reinstalling the cap.

SIZE - Set of 2 wrenches, suitable for gland nuts with a pin hole size of ≥ 1/5 inch. The larger wrench is adjustable from 2 to 6 inches and the smaller wrench is adjustable from 1 to 3.75 inches.

【Application Range】Suitable for gland nuts with a pin hole size of ≥ 1/4 inch. The claw is adjustable within the range of 2 to 6 inches

GREAT FITMENT: Universal hydraulic cylinder spanner wrench works on most farm and construction equipment, fits for Case 480E/580/580D/580 SE/580 ck/180 Backhoe, Case 1150h dozer, Bobcat cylinders, Hyd Cyl and etc.
Employ Safe Striking Methods When Wrenches Fail
When the pipe‑wrench extension finally gives you that sweet torque boost but the cap still won’t budge, it’s time to bring in a percussive approach. Grab a dead‑blow hammer; its controlled strike gives you impactibration timing without the rebound that a regular hammer would add. Hit the cap’s outer edge with firm, sharp whacks, letting the hammer’s impact damping protect the surface from denting. If you have a brass drift, place it against the cap and pound it with a sledgehammer—this softer striking surface keeps deformation low while still shaking loose rust. After a few rounds, the vibration gradually separates the corrosion, and a quick wrench retry usually frees the cap.
Inspect for Damage and Protect the Cylinder After Striking
After you’ve given the end cap a few solid whacks, the first thing you should do is look it over for any signs of damage before you start re‑assembling anything. Grab a magnifying glass and scan the surface for cracks, dents, or deformation. Check the threads for stripping, galling, or corrosion, and measure depth with calipers—if you’re under 80 % engagement, you’ve got serious wear. Do a seal gland inspection; make sure the holes aren’t rounded and stay above the 1/8‑inch threshold. Once you’ve confirmed everything looks okay, move on to anti‑seize application on the threads. This thin coat keeps future removal easy and protects against rust, letting you re‑install the cap with confidence. Remember to follow environmental disposal guidelines when cleaning any hydraulic fluid residue to prevent contamination. A healthy hydraulic system often emits a faint sweet metallic odor that signals normal operation.
Troubleshoot Seized Caps, Damaged Threads, and Warped Ends
Even if you’ve already tried a few taps and a quick spray of penetrating oil, a seized cap can still stubbornly cling to its cylinder, and warped ends or stripped threads only make the job harder. First, do a thorough thread inspection; clean the threads with a pressure washer, then look for cross‑threads or missing material. If they’re damaged, drill a few relief holes in the gland nut and use an air chisel or a breaker bar with a chain wrench for extra grip. For warped ends, clamp the cylinder, strike the outer edge with a dead‑blow hammer, and re‑check seal integrity after straightening. Heat the cap with a rosebud torch if Loctite is present, and always relieve pressure before applying force.

【GREAT COMPATIBILITY】: Perfectly fit for all Yamaha Suzuki Johnson Evinrude Hydraulic Trim/Tilt End caps, also suitable for All Seastar Hydraulic Steering End Caps.

【Wide Application】Perfectly fit for all Yamaha Suzuki Johnson Evinrude Hydraulic Trim and Tilt End Caps; Also fits for All Seastar Hydraulic Steering End Caps.
Application--Designed to remove gland nut on many hydraulic cylinders typically found on agricultural loaders, compact tractor loaders, and skid steer loaders,like Case. Also used to remove some outboard trim cap , like for Mercruiser Alpha equipments.
Prevent Future Seizing of Sealed End Caps With Proper Maintenance
A seized end cap isn’t just a nuisance; it’s a sign that something in your maintenance routine is off. Start by checking the end caps each season for corrosion, leaks, and wear. Verify the seal groove depth stays between 0.120″ and 0.150″ and that the surface finish hits 16‑32 RMS. When you replace a seal, focus on seal material selection—pick a compound that resists the hydraulic oil you use and can handle temperature spikes. Follow torque calibration guidelines religiously; a torque wrench set to the OEM spec prevents over‑tightening that deforms the groove. Keep fluid clean with a high‑quality filter, monitor temperature, and swap out worn rods or pins promptly. By staying on top of these steps, you’ll keep your leaf blower, wood chipper, or log splitter humming without a stuck cap.