You’ll want to disconnect the spark plug first, then remove your blades and inspect them for nicks or dullness—stringy chips and increased noise are your red flags. Set your bench grinder or sharpening stone to 30–45 degrees, matching your manufacturer’s spec, then apply light, consistent pressure in one direction to avoid overheating. The good news is rotating blades after 12 hours of cutting gives you roughly 60 extra hours before replacement. Store them dry and covered, and you’ll keep your chipper running smooth and safe for years.
Remove, Secure, and Prep Your Blades
Before you can sharpen those dull blades, you’ve got to get them out safely—and that means treating this job like it deserves your full attention. Start by disconnecting the spark plug and wearing cut‑resistant gloves. Follow OSHA lockout/tagout standards, then access your blades by opening the feed hopper and rotating the drum until you spot them. Remove the inspection plate with your socket wrench, then jam a wood piece in the drum to lock it down. Loosen the two Allen bolts counterclockwise, using an opposite key to secure the screw while you work. Carefully lift each blade free. Once removed, scrape the mounting surface clean and inspect for nicks or debris. For optimal performance, plan to replace your blades every 3 to 6 months based on your usage intensity rather than attempting to sharpen them repeatedly. Proper blade storage and blade balancing start here—with a clean, damage‑free foundation. Bleeding a hydraulic system can be done without a dedicated bleeder valve by following a systematic, step‑by‑step process. Use a seal driver to ensure the new seal seats evenly and prevents future leaks. Properly bleeding a hydraulic cylinder removes air pockets that can cause uneven pressure and reduced cutting efficiency.

Wood Shredder Chipper Blades for Landworks Compatible Models Include (but may not be limited to): SuperHandy LCE12, Greatcircleusa GUO033 GUO035 GUO054, GARDENBEAUT S1/S3 and EFCUT A30 series, B40 series , C30, C30 Mini, C30 LITE&3-IN-1 Wood Chippers Shredders with a maximum cutting diameter of 3 inches

Durable Construction: 4pcs wood chipper replaceable blades, 8pcs screws with L-Shaped Hex Key Wrench.

Compatible With: Yeryork electric wood chipper model YE004.
Diagnose When Your Blades Need Sharpening
Watch your chip quality first—if you’re seeing stringy slivers or splintered wood instead of clean chips, blade dullness is likely your culprit. You’ll also notice the machine working harder, producing more noise and dust than usual. Check the blades themselves: rounded edges and visible nicks signal sharpening time. The chipping process’ll slow down noticeably, and you might feel reduced self-feeding.
Here’s the thing—don’t wait for complete failure. After 24 hours of use, schedule a sharpening. With tough materials, sharpen after just 10-15 hours. Deep cracks mean replacement, not sharpening. Keep tabs on what you’re chipping too; stones and dirt accelerate wear dramatically. A random sander with 100-grit removes far less metal than professional sharpening, extending blade life considerably. Staying ahead of blade dullness keeps your output quality consistent. Proper hydraulic fluid maintenance also ensures the chipper operates smoothly while you work on blade care. Regularly inspect the blade guard before each session to catch wear early. Be sure to follow the hydraulic pump priming checklist before any major blade work.

【Sharpen Smarter, Cut Cleaner】Whether you're a woodworking enthusiast or a seasoned craftsman, the YIDAZLE Chisel Sharpening Kit helps you restore razor-sharp edges with ease. Featuring a precision honing guide and five diamond sharpening stones, this all-in-one set delivers consistent bevel angles and clean, controlled results—say goodbye to dull blades and uneven cuts.

For Accurate Honing: This chisel sharpening kit consists of a sharpening guide, a sharpening stone, a sharpening angle gauge and a sharpening angle fixture for creating straight and consistent bevel. Two adjustable jaws of the sharpener help securely clamp the blade at the correct bevel angle to whetstone surface. Make each honing accurate, consistent, and effective

Switch body material: metal
Set the Correct Sharpening Angle (20–45 Degrees)
Once you’ve spotted those telltale signs of dullness, getting the sharpening angle right is what separates a quick tune‑up from a frustrating mess—and honestly, it’s easier than you’d think. Most chipper blades fall between 30 and 45 degrees, though your manufacturer manual or stamped blade marking gives you the exact factory spec. Here’s the thing: maintaining that original angle is essential for clean chips instead of stringy, frayed mess.
For angle verification, grab a digital protractor or adjustable square—they’ll keep you within ±0.5 degrees. Tool calibration matters too; set your bench grinder or honing guide to match those specs before you start. Use light, consistent pressure and move in one direction. Chipper blades are case-hardened with a soft core and hardened edges, so excessive material removal can reach that soft core and reduce edge retention. Get this right, and your chipper’ll practically pull branches through on its own. Selecting the right hydraulic fluid also helps protect the system during sharpening, as fire‑resistant fluids reduce the risk of ignition from spark‑induced heat. Always wear appropriate protective gear to guard against accidental splashes and ensure proper containment of any spilled fluid. Understanding pressure flow dynamics is crucial for matching the fluid to the blade’s power requirements during sharpening.

High Quality: The Angle Grinder Stand is made of premium plastic material, durable to use. And the spring tough spring returns quickly and does not deform after being stretched. Its non-slip silicone fixed shaft can provide more accurate positioning.

Multifunctional angle grinder bracket: A bracket that can be used for both angle grinder and electric drill. The thickened base is stable and supports 45° angle cutting, making it more practical.
Adjustable Lock-nut Grinder Wrench
Pick the Right Tool to Sharpen Blades
The tool you choose makes all the difference between a quick blade refresh and an afternoon of frustration—and honestly, you’ve got several solid options depending on your setup and how often you’re maintaining your chipper.
For tool selection, a bench grinder works great if you’re sharpening multiple blades regularly. It’s fast and efficient, though you’ll need a steady hand to protect blade safety and prevent overheating. If you prefer precision, sharpening stones give you controlled, hands‑on results without heat damage—perfect for minor touch‑ups.
Belt grinders with 120‑grit paper strike a nice balance for DIY work, delivering functional sharpness quickly. A deep 16 mil socket can be ground flat on the belt grinder for proper bolt access when reinstalling your blades. Angle grinders work too, though they’re less precise. Whatever you pick, pair it with a sharpening jig to maintain consistent bevels and protect blade integrity. Using a hydraulic ram pump can provide off‑grid power for the grinder when electricity is unavailable. Understanding hydraulic pressure helps you select the right pump for reliable blade maintenance. Selecting the right power source can also reduce environmental impact during seasonal yard work.
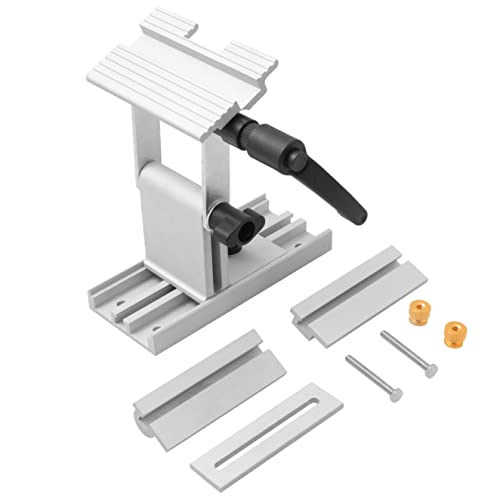
The Adjustable Replacement Tool Rest Sharpening Jig will allow you to locate all the basic sharpening positions with your bench grinder (grinder not included). The unique miter slide tool holder design allows the jig to be used more or less as a stone, which easily guides your blades, turning tools and chisels. Solid aluminum construction provides you with a smooth sliding, side to side action when sharpening.

Wide Compatibility: VEVOR sharpening tool rest jig is compatible with most 6" and 8" manual or electric bench grinders, as well as sanders, and angle grinders. It accommodates blades and chisels up to 2.5 inches wide. (Bench Grinder Not Included)
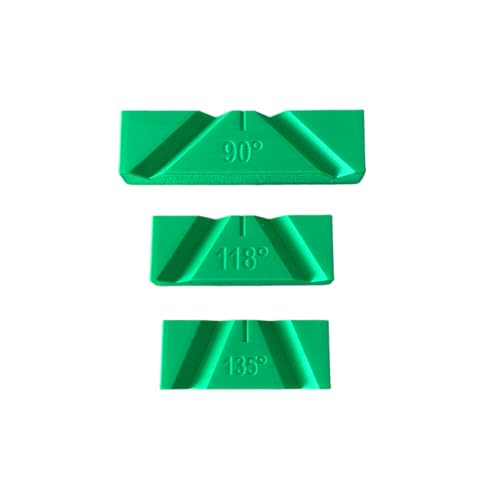
Versatile Angle Options: This set includes three drill bit sharpening guides, each designed for specific angles: 90°, 118°, and 135°. Choose the angle that suits your needs.
Sharpen With Slow, Steady Strokes
Most folks don’t realize that technique matters just as much as your tool choice—and honestly, that’s where a lot of DIYers go wrong when they’re trying to bring their chipper blades back to life. When you’re sharpening, slow and steady strokes are your best friend. You’ll want to apply controlled, deliberate movements rather than rushing through the job. This stroke control directly affects your blade balance, which determines how smoothly your chipper runs. Quick, aggressive strokes lead to uneven edges and vibration during operation. Instead, maintain consistent pressure and speed along the blade’s edge. Your patience pays off with a sharper, more balanced blade that chips wood cleanly and lasts longer. Choosing the right hydraulic fluid viscosity, such as ISO VG 32‑46, helps keep the system running smoothly during sharpening. Always store hydraulic fluid in a fire‑resistant container to minimize fire risk. Regularly testing fluid for discoloration can alert you to early signs of degradation.

Exceptionally Long Life: Designed for 6,000-hour severe service with high oxidation resistance, providing up to 3 times the lifespan of standard fluids, minimizing the need for frequent replacements

Exceptionally Long Life: Designed for 6,000-hour severe service with high oxidation resistance, providing up to 3 times the lifespan of standard fluids, minimizing the need for frequent replacements
Keep Your Sharpened Blades in Rotation
Why do so many folks let their wood chipper blades go dull when they could be getting twice the life out of them? The secret’s blade rotation—you’ve got double‑edged tools, so use them. After 12 hours of cutting with one sharpening, flip those blades to the fresh unused side. You’ll squeeze out roughly 60 more hours of chipping before needing replacement.
Here’s the thing: proper storage protection matters just as much. Keep your blades dry and covered when you’re not chipping. Store them separately from the machine if possible, and always clean them thoroughly before putting them away. Dull knives cause excessive vibration that spreads problems throughout your entire chipper. Since bed blades are made of 4140 heat‑treated steel, they require proper torque and gap maintenance to preserve their hardness and durability. By rotating blades strategically and protecting them properly, you’re preventing mid‑job failures and keeping your machine running smoothly for years. Always inspect the hydraulic fluid level before each use to ensure the system can handle the load. Be aware that prolonged exposure to leaking hydraulic fluid can cause skin irritation and respiratory issues. Recognizing the sweet petroleum‑like odor can alert operators to potential leaks before they become serious.